


Table of Contents
- What You'll Need
- Equipment
- Ingredients
- Understanding How a Siphon Brewer Works
- Why Brew Coffee with a Siphon?
- Step-by-Step Siphon Brewing Guide
- Preparation Steps
- Brewing Steps
- Expected Taste Profile
- Common Siphon Brewing Mistakes and How to Fix Them
- Water Won't Rise to the Top Chamber
- Coffee Tastes Weak or Sour
- Coffee Tastes Bitter or Harsh
- Drawdown Takes Forever
- Caring for Your Siphon Coffee Maker
- After Each Brew
- Weekly Deep Clean
- Frequently Asked Questions
- Is siphon coffee better than pour-over?
- How long does siphon coffee brewing take?
- Can I use pre-ground coffee in a siphon?
- What's the best coffee roast for siphon brewing?
- Why did my glass chamber crack?
- Summary and Your Next Steps
What You’ll Need
Before you fire up your burner and start channeling your inner mad scientist, let’s gather everything you need. Siphon brewing requires a few specific tools, but once you have them, you’re set for years of stunning coffee experiences.
Equipment
- Siphon coffee maker (vacuum pot) – A two-chamber glass brewer, typically 3-cup or 5-cup capacity
- Heat source – Butane burner, alcohol burner, or halogen beam heater
- Cloth or metal filter – Most siphons come with a reusable cloth filter
- Burr grinder – For consistent, fresh grounds
- Scale – Accuracy matters here
- Timer – Your phone works perfectly
- Bamboo paddle or wooden spoon – For stirring without scratching glass
Ingredients
- Fresh coffee beans – 20-25 grams for a 3-cup siphon
- Filtered water – 300-350ml (adjust based on your siphon size)
Barista Tip: If your siphon came with a cloth filter, soak it in warm water for at least 5 minutes before your first use. This removes any manufacturing residue and helps create a proper seal. Store used cloth filters in water in your refrigerator between brews to keep them fresh.
Understanding How a Siphon Brewer Works
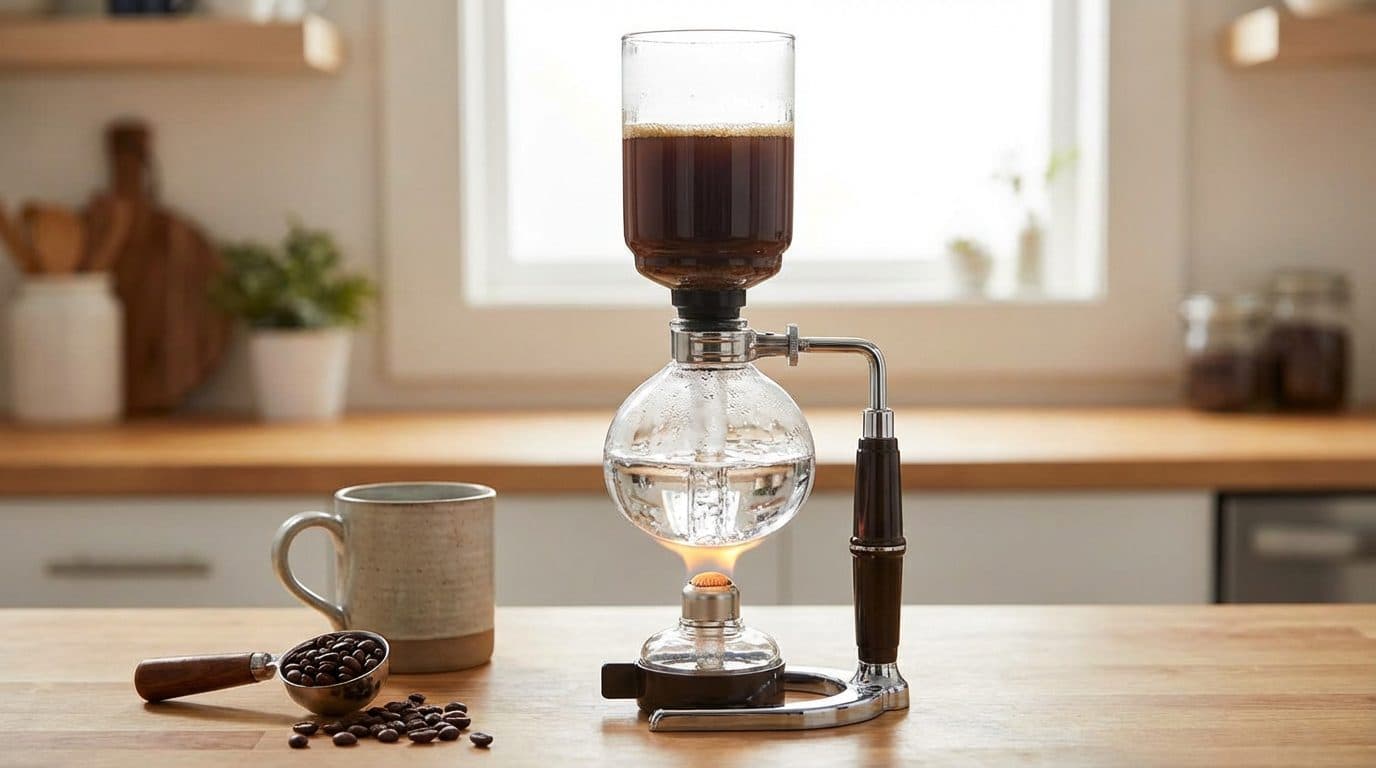
The siphon coffee maker looks like something from a chemistry lab, and that’s because it essentially is one. This vacuum pot brewing method might seem intimidating at first glance, but the science behind it is beautifully simple once you understand it.
Here’s what happens: you heat water in the bottom chamber (called the bulb or flask). As the water heats up, it creates vapor pressure that pushes the water up through a tube into the top chamber (the hopper). Your coffee grounds wait patiently in this upper chamber. When the water arrives, brewing begins. Once you remove the heat source, the pressure drops, and the brewed coffee gets pulled back down through the filter into the bottom chamber.
In short, siphon brewing uses physics instead of gravity to extract your coffee. The result? A remarkably clean, aromatic cup that highlights delicate flavor notes you might miss with other methods.
Why Brew Coffee with a Siphon?
I’ve found that siphon-brewed coffee has a clarity that rivals pour-over but with a slightly fuller body. The full immersion brewing combined with vacuum filtration creates something truly unique. Plus, there’s the undeniable theater of watching water defy gravity while you make your morning cup.
The vacuum pot method excels at bringing out bright, complex flavors. If you’ve got a bag of single-origin Ethiopian or Kenyan beans with fruity or floral tasting notes, siphon brewing will make those characteristics sing. Life is too short for bad coffee, and this method ensures you’re getting everything those beans have to offer.
Step-by-Step Siphon Brewing Guide
Now for the main event. Follow these steps carefully, especially during your first few attempts. Siphon brewing has a learning curve, but you’ll get comfortable with it faster than you might expect.
Preparation Steps
- Prepare your filter. If using a cloth filter, rinse it with hot water and attach it to the bottom of the upper chamber. Pull the chain through the tube and hook it at the bottom to secure the filter in place.
- Heat your water. Add filtered water to the bottom chamber. You can pre-heat the water in a kettle first to speed things up, or start with room temperature water for more control.
- Grind your coffee. Aim for a medium grind, similar to table salt. This is slightly finer than what you’d use for pour-over but coarser than espresso.
- Assemble the siphon. Place the upper chamber into the lower chamber at a slight angle. Don’t seal it completely yet because you want some steam to escape as the water heats.
Brewing Steps
- Light your heat source and position it under the bottom chamber. Watch as the water begins to heat up and small bubbles form.
- Seal the chambers once you see active bubbling. Press the upper chamber down firmly to create a complete seal. Water will begin rising into the top chamber within 30-60 seconds.
- Add your coffee grounds once most of the water has risen to the upper chamber. A small amount of water will remain at the bottom, and that’s normal.
- Start your timer and stir gently with your paddle. Use a cross pattern to ensure all grounds are saturated. Avoid aggressive stirring since you’re not making a smoothie.
- Let it brew for 60-90 seconds. You’ll see a crust of grounds floating on top. Give it one more gentle stir about halfway through.
- Remove the heat source after your brew time is complete. This is where the magic happens. Watch as the vacuum effect pulls the brewed coffee down through the filter.
- Wait for the drawdown to complete. This takes about 45-60 seconds. You’ll hear a bubbling sound as the last of the coffee comes through.
- Remove the upper chamber carefully and place it in a stand or holder. The bottom chamber now holds your finished coffee, ready to pour.
Barista Tip: The drawdown phase tells you a lot about your grind size. If it takes longer than 90 seconds, your grind is too fine. If it rushes through in under 30 seconds, grind finer next time. Aim for that sweet spot of 45-60 seconds for optimal extraction.
Expected Taste Profile
When brewed correctly, siphon coffee delivers a clean, tea-like body with excellent clarity. You’ll notice bright acidity, pronounced aromatics, and complex flavor notes. The cup is sweet with low bitterness when you nail the timing. I’ve found that lighter roasts particularly shine with this method.
Common Siphon Brewing Mistakes and How to Fix Them
Every beginner makes mistakes with vacuum pot brewing. I certainly did when I started. Here are the issues you’re most likely to encounter and how to troubleshoot them.
Water Won’t Rise to the Top Chamber
This usually means you don’t have a proper seal. Check that the rubber gasket is clean and properly seated. Also ensure you’re using enough heat. Alcohol burners especially need time to get hot enough. If your filter isn’t secured properly with the chain hook, that can also break the seal.
Coffee Tastes Weak or Sour
Under-extraction is the culprit here. Your water might not be hot enough when it reaches the grounds, or your brew time is too short. Try extending the brew by 15-30 seconds. Also double-check your coffee-to-water ratio since you might need more grounds.
Coffee Tastes Bitter or Harsh
Over-extraction happens when the water is too hot or the brew time is too long. The water in the upper chamber should maintain a gentle simmer, not a rolling boil. If you see violent bubbling, reduce your heat slightly. Keep your total brew time under 90 seconds for most recipes.
Drawdown Takes Forever
Your grind is too fine, or your filter is clogged. Adjust your grinder coarser for the next batch. If you’re using a cloth filter, it might need cleaning or replacing. Cloth filters should be replaced every few months with regular use.
Key Takeaway: Siphon brewing is all about temperature control and timing. Once you master these two elements, consistency becomes much easier. Keep notes on your first several brews so you can track what works and what needs adjustment.
Caring for Your Siphon Coffee Maker
Proper maintenance extends the life of your vacuum pot and ensures great-tasting coffee every time. Glass brewers require some extra care, but it’s straightforward once you establish a routine.
After Each Brew
- Rinse all glass components with warm water immediately
- Remove the cloth filter and rinse thoroughly
- Store the cloth filter submerged in water in your refrigerator
- Wipe down the metal or plastic components
- Let everything air dry completely before storing
Weekly Deep Clean
- Boil your cloth filter in clean water for 5 minutes to remove oil buildup
- Clean the glass chambers with a mixture of water and baking soda
- Inspect the rubber gasket for wear or coffee residue
- Check the filter chain and hook for any damage
Replace your cloth filter every 2-3 months, or sooner if you notice off-flavors or slow drawdown times. Metal filters last longer but require occasional scrubbing with a soft brush to remove buildup from the fine mesh.
Frequently Asked Questions
Is siphon coffee better than pour-over?
Neither method is objectively better since they simply produce different results. Siphon brewing creates a cleaner cup with more pronounced aromatics due to the vacuum filtration. Pour-over often has more body and is easier to make consistently. In my experience, siphon excels with light roasts and complex single-origin coffees, while pour-over is more forgiving and faster for daily brewing.
How long does siphon coffee brewing take?
From setup to finished cup, expect about 8-10 minutes for the entire process. The actual brew time is only 60-90 seconds, but heating the water and the drawdown phase add time. Pre-heating your water in a kettle can shave off 2-3 minutes.
Can I use pre-ground coffee in a siphon?
You can, but I wouldn’t recommend it. Pre-ground coffee loses its aromatics quickly, and the siphon method is designed to highlight those delicate flavors. If you’re investing in a siphon setup, a decent burr grinder is worth the additional purchase. Your taste buds will thank you.
What’s the best coffee roast for siphon brewing?
Light to medium roasts tend to work best because the siphon’s clean extraction showcases subtle flavor notes beautifully. Dark roasts can work but often taste flat or overly intense. Look for beans with tasting notes that mention fruit, florals, or tea-like qualities since those characteristics will shine in a vacuum pot.
Why did my glass chamber crack?
Thermal shock is the usual cause. Never place a hot glass chamber on a cold surface or add cold water to a hot chamber. Always let the glass cool gradually after brewing, and use a folded towel or trivet when setting down hot components. Also avoid touching the glass near the heat source during brewing.
Summary and Your Next Steps
Brewing coffee in a siphon at home might seem like a performance, but it’s really just physics doing the heavy lifting. Once you understand the basics of water temperature, grind size, and timing, you’ll produce consistently excellent cups that impress both yourself and anyone lucky enough to watch the show.
Start with the recipe outlined here: medium grind, 60-90 second brew time, and 1:15 coffee-to-water ratio. Take notes on each brew so you can dial in your preferences over time. Don’t get discouraged if your first few attempts aren’t perfect because that’s part of the journey.
By following these steps and paying attention to the details, you’ll be brewing stunning siphon coffee within a few sessions. Grab some fresh beans, fire up that burner, and enjoy the most theatrical coffee experience your kitchen has ever seen.



Comments