Have you ever noticed your espresso machine’s brew group becoming stiff, noisy, or harder to operate? If you’re nodding along, there’s a good chance your cam mechanism is crying out for some lubrication. Proper brew group maintenance is something many home baristas overlook, but I’ve found that a well-lubricated cam can be the difference between a machine that lasts five years and one that keeps pulling perfect shots for fifteen.
In this cam grease guide, you’ll learn exactly why lubricating the brew group matters, which greases are safe to use, and how to perform this simple maintenance task yourself without spending a fortune. Whether you own a Gaggia, Saeco, Breville, or any other machine with a removable brew group, this guide has you covered.
Why Lubricating the Brew Group Matters
The brew group is the heart of your espresso machine. It’s where the magic happens—water meets coffee under pressure, and espresso is born. Inside this mechanism, the cam system controls the movement of the piston that compresses your coffee puck and manages the brewing cycle.
Over time, the factory grease on these moving parts breaks down. Coffee oils, moisture, and general wear take their toll. When this happens, you might notice:
Increased resistance when inserting or removing the brew group
Grinding or squeaking noises during the brewing cycle
Jerky, uneven movement of the internal piston
Premature wear on plastic and metal components
In my experience, most manufacturers recommend lubricating the brew group every 500 cycles or roughly every two months for daily users. Skip this maintenance, and you’re looking at potential motor strain, broken gears, or expensive repairs down the line. A small tube of food-safe grease costs less than a bag of specialty beans—it’s a no-brainer investment.
The Hidden Cost of Neglect
Here’s a scenario I’ve seen too many times: A home barista buys a beautiful super-automatic machine, uses it daily for two years without maintenance, and suddenly the brew group seizes. The repair bill? Often $200 to $400, plus shipping. The cause? Dried-out grease that would have cost $10 to replace. Life is too short for bad coffee—and for avoidable repair bills.
Choosing the Right Cam Grease for Your Brew Group
Not all greases are created equal, and using the wrong type can damage your machine or contaminate your coffee. The cam grease you choose must be food-safe, tasteless, odorless, and compatible with plastics and rubber seals.
What to Look For
When shopping for brew group lubricant, keep these criteria in mind:
NSF H1 certification – This indicates the grease is approved for incidental food contact
Silicone-based formula – Safe for O-rings and plastic components
High viscosity – Stays in place rather than dripping into your coffee
Temperature stability – Won’t break down from the heat of brewing
Popular Food-Safe Grease Options
Here’s a quick comparison of commonly recommended cam greases:
Product
Type
Best For
Approximate Cost
Saeco/Philips OEM Grease
Silicone-based
Saeco, Philips, Gaggia machines
$8–$12
Super Lube 21030
Synthetic with PTFE
All brew group types
$6–$10
Molykote 111
Silicone compound
O-rings and seals
$10–$15
Haynes Lubri-Film Plus
Food-grade petroleum
Metal-on-metal contact
$8–$12
Key Takeaway: When in doubt, stick with your machine manufacturer’s recommended grease or a well-known food-safe option like Super Lube 21030. It’s widely available, affordable, and compatible with virtually all brew group materials.
What to Avoid
Never use standard household lubricants like WD-40, petroleum jelly, or automotive grease on your brew group. These products can degrade rubber seals, contaminate your coffee with harmful chemicals, and leave behind unpleasant tastes. I’ve heard horror stories of people using cooking oil as a “natural” alternative—please don’t. It goes rancid, attracts mold, and creates a sticky mess.
How to Lubricate Your Brew Group: Step-by-Step
Now let’s get into the actual process. The good news? Lubricating the brew group is genuinely simple and takes about 10 to 15 minutes once you know what you’re doing. No special tools required.
What You’ll Need
Food-safe cam grease (small tube or syringe)
Clean, lint-free cloth or paper towels
Warm water
Soft brush (optional, for cleaning residue)
Your machine’s user manual (for brew group removal instructions)
Step-by-Step Instructions
Step 1: Turn off and unplug your machine. Safety first. Let it cool down if you’ve recently brewed coffee. You don’t want to handle hot components.
Step 2: Remove the brew group. Open the service door (usually on the side of super-automatic machines) and release the brew group according to your manufacturer’s instructions. Most units have a release lever or button. The brew group should slide out smoothly—if it doesn’t, that’s a sign it definitely needs lubrication.
Step 3: Rinse the brew group. Hold it under warm running water to remove coffee residue and old grease. Don’t use soap—it can leave residue that affects coffee taste. Let it air dry completely or gently pat it dry with a clean cloth.
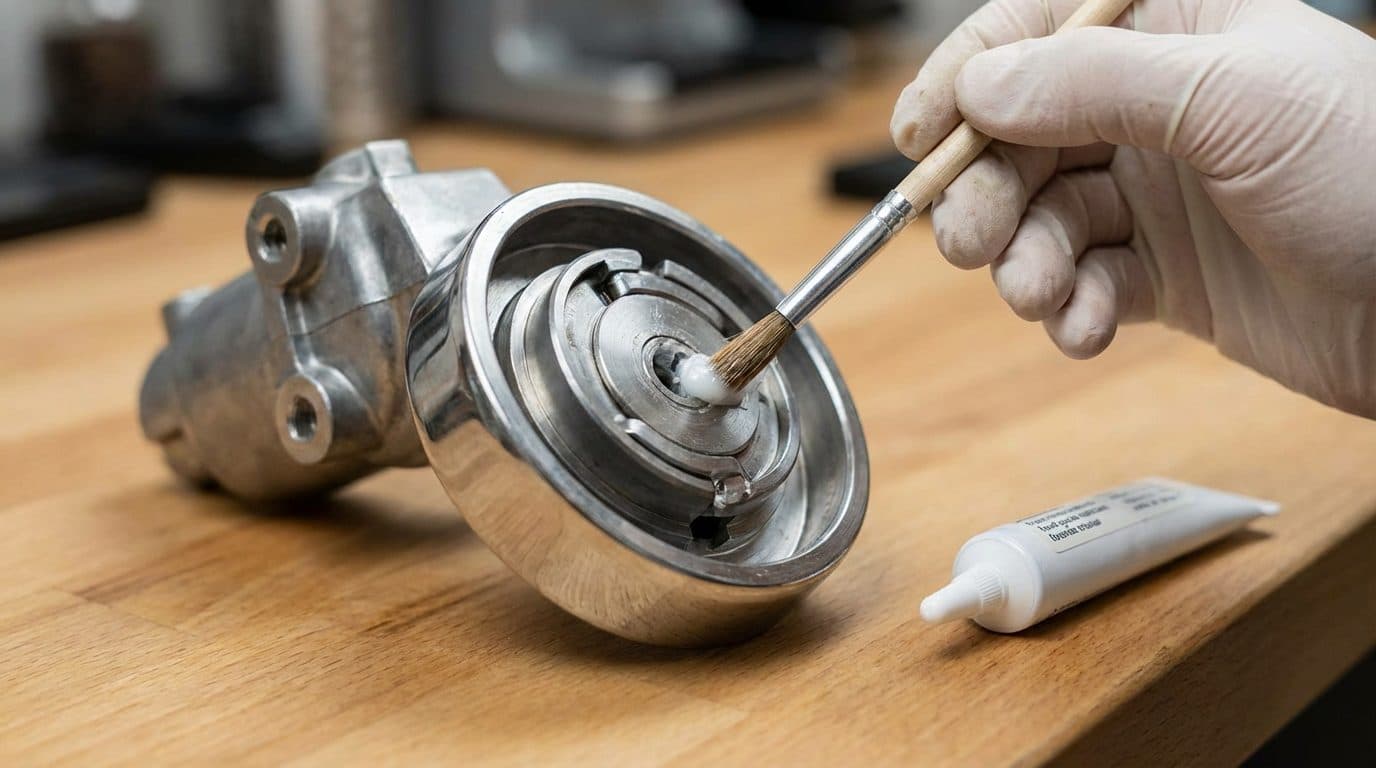
Step 4: Identify the lubrication points. Look for the following areas:
The cam track (the curved channel where the piston follower rides)
The O-ring seal at the top of the brew chamber
The sliding rails on either side of the brew group
Any visible pivot points or hinges
Step 5: Apply grease sparingly. Less is more here. Apply a thin, even layer of grease to each lubrication point. For the cam track, I like to use my fingertip to spread a small amount along the entire groove. For O-rings, a light coating around the circumference is sufficient.
Barista Tip: After applying grease, manually cycle the brew group mechanism a few times by pressing the piston up and down. This distributes the lubricant evenly across all contact surfaces.
Step 6: Reinstall the brew group. Slide it back into your machine until it clicks securely into place. Close the service door and run a water-only brew cycle to flush any excess grease.
Common Mistakes When Lubricating the Brew Group
Even simple maintenance tasks can go wrong. Here are the pitfalls I’ve encountered—and how to avoid them.
Using Too Much Grease
Over-lubrication is probably the most common mistake. Excess grease doesn’t improve performance; it just creates a gooey mess that attracts coffee grounds and can drip into your cup. A thin film is all you need. If you can see thick globs of grease, you’ve overdone it.
Skipping the Cleaning Step
Applying fresh grease over old, degraded grease and coffee residue defeats the purpose. Always rinse and dry the brew group first. Think of it like applying moisturizer to dirty skin—it just traps the grime underneath.
Forgetting the O-Rings
The main O-ring at the top of the brew chamber is critical for maintaining proper pressure during extraction. A dry O-ring can crack, causing leaks and pressure loss. While you’re lubricating, give that seal some love too.
Lubricating Non-Removable Parts
Some machines have brew groups that aren’t designed to be removed by the user. If your machine falls into this category (like many traditional semi-automatic espresso machines), don’t force it. Consult your manual or a professional technician for internal lubrication.
How Often Should You Lubricate?
The frequency depends on your usage patterns and water quality. Here’s a general guideline:
Light use (1–2 cups daily): Every 3–4 months
Moderate use (3–5 cups daily): Every 6–8 weeks
Heavy use (6+ cups daily): Monthly
Hard water accelerates the breakdown of lubricants, so if you live in an area with mineral-heavy water, lean toward more frequent maintenance. You’ll also want to lubricate after any deep cleaning or descaling, as these processes can strip away existing grease.
In short: If your brew group starts feeling sticky or sounding crunchy, it’s time—regardless of the calendar.
Frequently Asked Questions
Can I use Vaseline or petroleum jelly on my brew group?
No, avoid petroleum jelly and similar products. They’re not food-safe for repeated contact and can degrade rubber O-rings and plastic components over time. Stick with NSF H1 certified or manufacturer-recommended food-grade greases.
My brew group is stuck and won’t come out. What should I do?
First, ensure the machine is completely off and cooled down. Try running a rinse cycle to reset the internal mechanism. If it’s still stuck, consult your user manual for a reset procedure. Forcing it can break the release mechanism—when in doubt, contact a technician.
Is silicone grease the same as silicone spray?
No, they’re different products. Silicone spray is much thinner and evaporates quickly, offering little lasting protection. Silicone grease is a thick lubricant that stays in place. For brew group maintenance, you want the grease, not the spray.
How do I know if my brew group needs lubrication?
Signs include stiff operation, squeaking or grinding sounds, visible dryness on the cam track, or difficulty inserting and removing the brew group. If your machine sounds different than it used to, lubrication is often the culprit.
Can over-lubricating damage my machine?
While unlikely to cause immediate damage, excess grease can migrate into areas where it doesn’t belong, attract coffee particles, and create hygiene issues. It can also drip into your coffee, affecting taste. Always apply thin, even layers.
Conclusion and Next Steps
Lubricating the brew group is one of those small maintenance tasks that pays big dividends. By spending 15 minutes every couple of months, you’re protecting your investment, ensuring smooth operation, and keeping your espresso tasting exactly as it should. No weird mechanical noises, no premature wear, no expensive repairs.
If you’ve never lubricated your brew group before, today is a great day to start. Grab a tube of food-safe grease, set a reminder on your phone, and make it part of your regular coffee routine. Your machine—and your morning cup—will thank you.


Comments