Ever watched a barista pour a perfect rosetta and thought, “I could do that”—only to waste half a bag of expensive coffee beans on messy attempts? You’re not alone. Latte art practice can feel like an expensive hobby, especially when you’re going through liters of milk just to nail the basics. Here’s the good news: you can master the fundamentals of latte art without spending a fortune on coffee and milk. The secret? Soap and water.
In this guide, I’ll walk you through how to use this simple, cost-free method to build your pouring technique, develop muscle memory, and gain the confidence you need before stepping up to real espresso and steamed milk. Whether you’re a complete beginner or someone looking to refine your skills, latte art practice with soap and water is a game-changer.
Why Practice Latte Art with Soap and Water?
Let’s be honest—learning latte art the traditional way gets expensive fast. Between specialty coffee beans, fresh milk (that you can only steam once), and the time spent pulling shots, the costs add up quickly. I’ve found that soap and water practice removes these barriers entirely.
The primary benefit is repetition without consequences. Great latte art comes from muscle memory, and muscle memory requires hundreds—sometimes thousands—of pours. With soap and water, you can practice fifty pours in an afternoon without worrying about waste or cost.
The Science Behind the Substitution
Soap mixed with water creates a surprisingly good approximation of steamed milk’s texture. The soap reduces surface tension and creates tiny bubbles, mimicking the microfoam you’d get from properly steamed milk. While it’s not a perfect replica, it’s close enough to help you learn:
Pitcher control and angle
Pour height and flow rate
Wrist movements for pattern creation
Timing and rhythm of the pour
In short, you’re training the mechanical aspects of latte art without needing the real thing. Once these movements become second nature, transitioning to actual milk feels much more intuitive.
What You’ll Need for Soap and Water Latte Art Practice
One of the best parts about this method is how little you need to get started. Chances are, you already have everything at home.
Essential Gear
Milk pitcher (12-20 oz) – Use the same pitcher you’d use for real latte art. This keeps your practice consistent.
Wide-mouthed cup or mug – A latte cup or cappuccino cup works perfectly. Avoid narrow mugs.
Dish soap – Regular liquid dish soap works great. You only need a few drops.
Water – Room temperature or slightly warm water is ideal.
A towel – For cleanup between pours.
Optional: Food coloring – Adding a drop of food coloring to your “espresso” (plain water in the cup) helps you see contrast, just like real latte art.
Setting Up Your Practice Station
Find a comfortable spot near a sink—you’ll be pouring and refilling constantly. Lay down a towel to catch spills. Have your pitcher and cup within easy reach, and keep the soap bottle nearby for quick top-ups.
Barista Tip: Practice near a mirror or record your pours on your phone. Watching your technique from different angles helps you spot mistakes you’d otherwise miss.
How to Make Your Practice “Milk” and “Espresso”
Getting the right consistency is crucial. Too much soap and you’ll have excessive bubbles; too little and the water won’t behave like microfoam at all.
Creating the Soap and Water Mixture
Here’s my tried-and-tested ratio for the best results:
Fill your milk pitcher about two-thirds full with water.
Add 3-5 drops of dish soap. Start with less—you can always add more.
Use a milk frother, whisk, or simply swirl vigorously to incorporate the soap and create bubbles.
Let the mixture settle for 10-15 seconds. You want small, uniform bubbles, not large, soapy foam.
The texture should resemble wet paint—glossy and smooth with tiny bubbles throughout. If you see large bubbles, give the pitcher a firm tap on the counter and swirl again.
Preparing Your “Espresso”
Fill your cup about one-third full with plain water. This represents your espresso base. Adding 2-3 drops of food coloring (brown, red, or even blue—whatever you have) creates contrast that makes it easier to see your patterns.
Some people use cold coffee or tea for a more realistic look, but plain colored water works perfectly for practice purposes.
Latte Art Practice Techniques with Soap and Water
Now for the fun part—actually pouring. In my experience, beginners should start with the most fundamental pattern: the heart. Once you’ve nailed that, you can progress to tulips and rosettas.
Mastering the Basic Heart
The heart is the foundation of all latte art. Every other pattern builds on the skills you develop here.
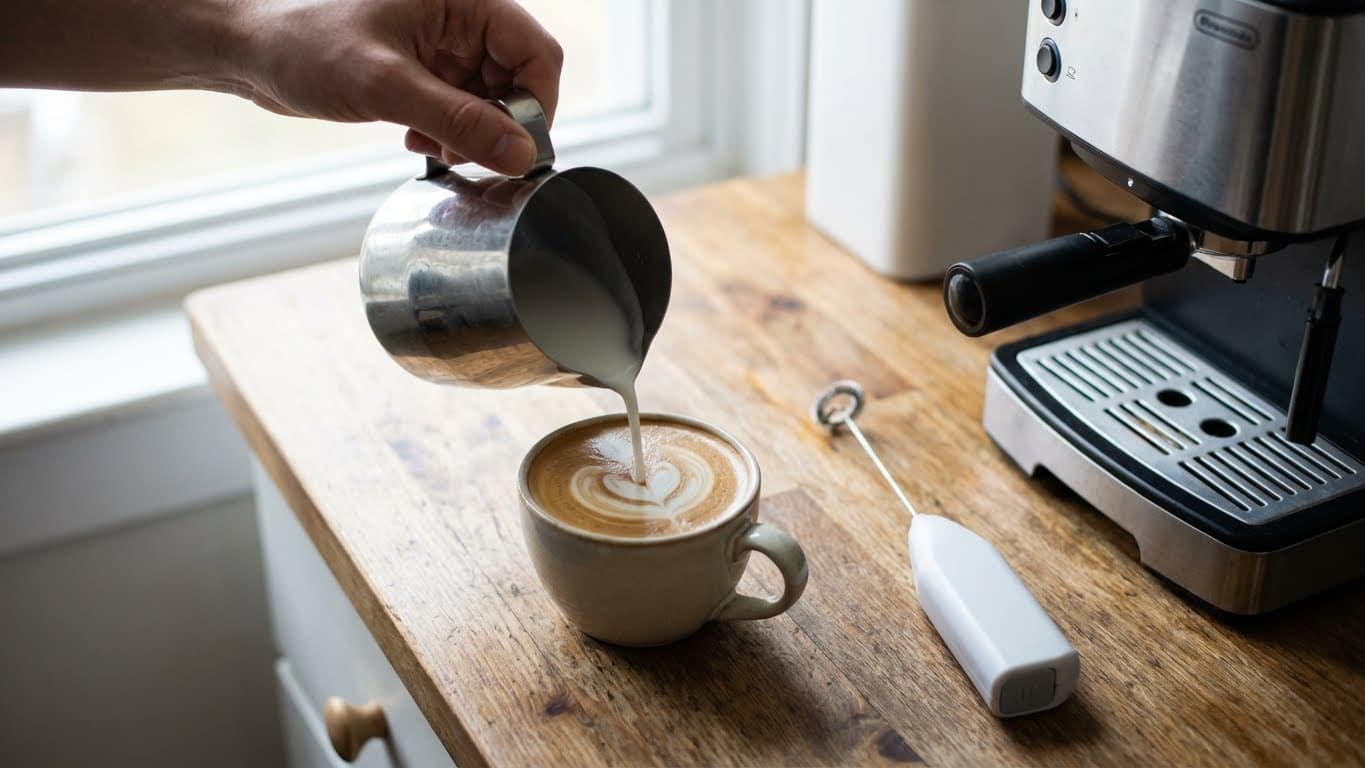
Start high – Begin your pour from about 3-4 inches above the cup. This allows the “milk” to dive beneath the surface.
Pour into the center – Aim for the middle of the cup, keeping a steady, thin stream.
Drop low when half full – As the cup fills, lower your pitcher until the spout nearly touches the surface. This is when the white starts appearing.
Wiggle gently – Small side-to-side movements help spread the white across the surface.
Strike through – When the cup is nearly full, lift slightly and pull through the center of the white circle to create the heart’s point.
Expect your first attempts to look nothing like a heart. That’s completely normal. The goal with soap and water practice is repetition until the movements feel natural.
Progressing to the Tulip
Once you can consistently pour a heart, try the tulip. This pattern requires you to “stack” multiple hearts on top of each other.
Pour a small heart shape, then pull back (stop pouring momentarily).
Move your pitcher slightly toward you and pour again, pushing the first shape forward.
Repeat 2-3 times, creating layered petals.
Finish with a strike-through, just like the heart.
The tulip teaches you crucial skills: controlling your pour rate, knowing when to pause, and understanding how milk moves in the cup.
Tackling the Rosetta
The rosetta is where things get challenging—and where soap and water practice really shines. This pattern requires continuous, controlled wiggling while slowly moving the pitcher backward.
Think of it like drawing a fern leaf. Your wrist does small, rapid side-to-side movements while your arm gradually pulls the pitcher toward the edge of the cup. The final strike-through creates the stem.
Barista Tip: Speed matters. Rosettas require faster, more confident movements than hearts. Practice your wiggling motion in the air before attempting it with liquid.
Common Mistakes and How to Fix Them
Even with soap and water, you’ll encounter the same issues that plague beginners working with real milk. Here’s what to watch for:
No White Showing Up
If your pours disappear into the “espresso” without leaving any pattern, you’re likely:
Pouring from too high throughout the entire pour
Using too thin a stream
Not getting close enough to the surface at the right moment
The fix: Focus on that crucial transition from high to low pour. The white only appears when the spout is close to the liquid surface.
Patterns That Sink or Disappear
This usually means your “milk” doesn’t have enough foam, or you’re pouring too slowly once you drop low. Try adding another drop of soap and swirling more vigorously.
Asymmetrical Shapes
If your hearts look lopsided, pay attention to where you’re aiming. Most people unconsciously pour off-center. Try positioning the cup at different angles until you find what works for your natural hand position.
Transitioning from Soap and Water to Real Milk
Here’s the honest truth: real steamed milk behaves differently than soap and water. The weight, texture, and flow aren’t identical. However, the muscle memory you’ve built transfers remarkably well.
When you make the switch, expect a short adjustment period. Real milk is denser and flows differently, but your hands will already know the basic movements. You’ll spend your mental energy on fine-tuning rather than learning from scratch.
Tips for a Smooth Transition
Steam your milk properly – All the pouring technique in the world won’t help if your microfoam is wrong. Aim for a glossy, paint-like texture with no visible bubbles.
Work with fresh crema – Fresh espresso with good crema provides the canvas for your art.
Don’t overthink it – Trust the muscle memory you’ve developed. Your hands know what to do.
In my experience, people who practice with soap and water for a few weeks before using real milk progress much faster than those who start with milk right away. The cost savings alone make it worthwhile.
Frequently Asked Questions
Does soap and water really help with latte art?
Yes, it genuinely works. While the texture isn’t identical to steamed milk, soap and water allows you to practice the mechanical aspects of pouring—pitcher angle, pour height, wrist movements—without wasting expensive ingredients. Many professional baristas recommend this method for beginners.
What type of soap works best for practice?
Regular liquid dish soap works perfectly. You only need a few drops per pitcher of water. Avoid heavily scented or thick soaps, as these can create inconsistent foam. Clear dish soap tends to work slightly better than opaque varieties.
How long should I practice before using real milk?
There’s no magic number, but I’d suggest practicing until you can pour a recognizable heart shape consistently—maybe 8 out of 10 attempts. This typically takes a few practice sessions, totaling 2-4 hours of active pouring. From there, real milk will feel like a natural next step.
Can I practice without an espresso machine?
For soap and water practice, you don’t need any coffee equipment at all. When you’re ready to use real milk, you can steam milk using a French press (pump vigorously with hot milk) or a handheld frother. It won’t be perfect, but it works for learning.
Why don’t my patterns look like the ones I see online?
Patience is key. Those Instagram-worthy pours come from baristas who have made thousands of drinks. Focus on the fundamentals first—consistent hearts—before chasing complex designs. Even a simple heart looks impressive when executed cleanly.
Conclusion and Next Steps
Latte art practice with soap and water is one of the best-kept secrets for aspiring home baristas. It removes the financial barrier, allows for unlimited repetition, and builds the muscle memory you need to succeed with real milk. Life is too short for bad coffee—and it’s also too short to waste good coffee on practice pours.
Start with the heart, master the fundamentals, and don’t rush the process. Set aside 15-20 minutes a few times a week for dedicated practice, and you’ll be amazed at how quickly your pours improve. When you finally transition to real espresso and steamed milk, those beautiful patterns will flow naturally. Now grab a pitcher, add some soap, and start pouring—your perfect rosetta is closer than you think.


Comments